It doesn’t take a professional photographer to know how to restore old photos. With Photoshop, anyone can do it with a few basic tricks to even the most discolored or cracked images to give them new life.
Just follow our guide below for 10 simple steps for photo restoration, and you’ll have beautiful photographs in no time at all. And when you’re done, you can use these updated photos in a photo book or a photo gift to make a one-of-a-kind creation.
Adding the Image to Your Computer

-
- Use a high resolution setting on a camera or scanner to capture a digital image.
- On your computer save (or resave) the image on the highest .jpg setting.
- Click on the Photoshop icon to open.
- In Photoshop, click File > Open and choose the picture you want in the browser.
- Click to open your file in Photoshop.

-
- To check if this image has the desired resolution (at least 300 DPI) go to Image > Image Size. A dialogue box will appear. The resolution is shown in DPI, or dots per inch. If the number is less than 300, check the settings on your camera or scanner and start again. You’ll want to be sure it’s crisp when it prints.
Preparing the Image in Photoshop

-
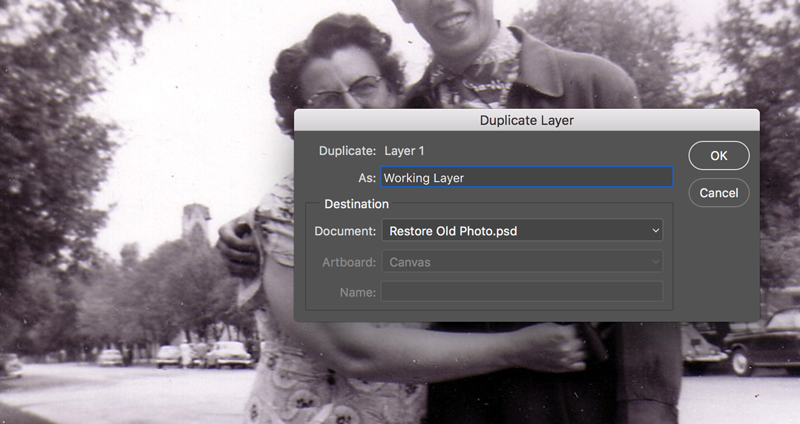
- First, create a new layer by clicking Layers > Duplicate Layer.

-
- When prompted, name this layer “Working Layer” so you do not confuse the original image.
Cropping the Borders

-
- If borders are ragged, use the Crop tool represented by an icon that looks like a square where the sides continue past the borders.
- Click and drag to select the amount of image you want to keep within the dotted lines.
- Click any other tool to finish the crop and click Yes to confirm.
Adjusting Brightness and Contrast

-
- Go to Layer > New Adjustment Layer > Brightness and Contrast.
- Name the new layer Brightness/Contrast 1 and click OK.
- The Brightness and Contrast Dialogue box will appear.
- Toggle the slider to change the brightness of the image. Toggling one way will increase light and minimize darkness, though be careful as too much one way or the other may wash out an image.

-
- Find the Brightness setting that makes the image as clear as possible.
- Toggle the slider to adjust contrast. It will create higher and lower distinctions between the colors.
- Find the contrast setting that works best for the image.
- Hit Control+E (or Command+E on Mac) to merge the Brightness/Contrast adjustment and image layer.
Adjusting Faded Color

-
- In the Layer menu, click on the Working Layer image layer.
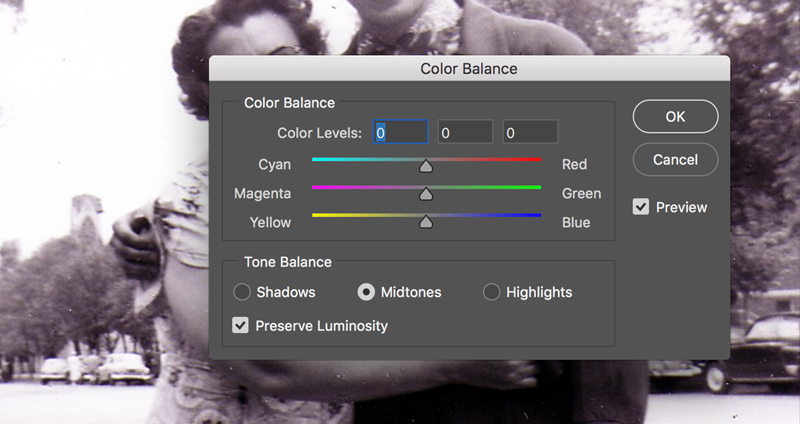
- Go to Image > Adjustments > Color Balance.
- The Color Balance dialogue box will appear.

-
- Make sure the “Preserve Luminosity” box is checked to maintain the brightness and contrast that was just established.
- Select the Midtones radio button.
- Adjust color using the sliders until you have the desired effect. Click OK.
- Select the shadows radio button and highlights radio button and repeat this process.
- Go to Image > Adjustments > Hue/Saturation
- The Hue/Saturation dialogue box will appear.
- Toggle the Hue and Saturation sliders until you reach the desired effect. Click OK.
Removing Dust and Scratches with Spot Healing

-
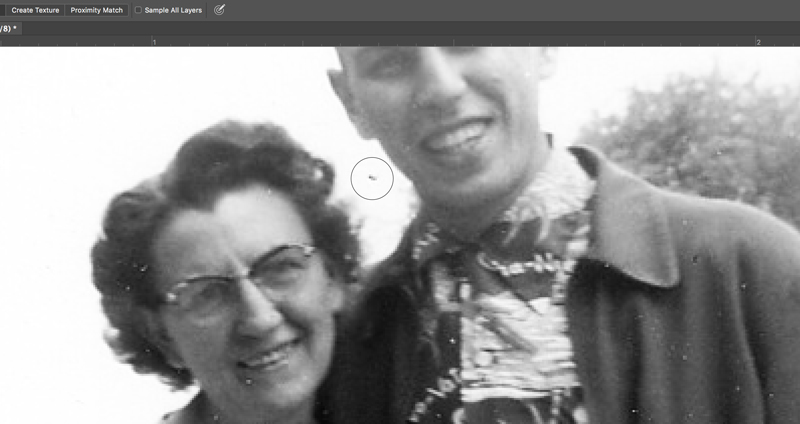
- Go to the Spot Healing tool represented by a band-aid on the control panel.
- Above the image click the box next to the words “Content-Aware”.
- Press control (or command) and + to zoom in. You may want to adjust the zoom to isolate small patches (zoom can be adjusted in bottom left corner).
- Select a small brush size from the brush menu. The size depends on the size of your photo and how detailed you need it.
- Use a round brush and toggle the hardness slider to 75%.

-
- Place the Spot Healing tool over any specks of dust and click to remove them. This may cause discoloration in some areas but this can easily be fixed.
Erasing Lines or Cracks With Clone Stamp Tool
-
- Create a duplicate layer of the working layer by clicking Layers > Duplicate Layer.
- Name this layer “Clone Stamp” and click OK.
- Click on the Clone Stamp tool represented by an icon that looks like a hand stamp.
- Above the image, where it says “Sample”, choose “Current Layer” in the drop-down menu.
- On the brush menu, soften your brush by toggling the hardness slider to 0%.
- While holding the Alt button, click on a clean part of the image near a line or anomaly. This will clone that portion (you will see a target appear).
- Release Alt and then carefully apply the brush by clicking on a part you would like to change. The brush will use the cloned part of the image to effectively erase a line or crack.
- If necessary, use the opacity toggle (found above the image) to adjust the opacity of the brush and reduce the stark look of any changes.
- This tool can also be used to smooth spot healing anomalies by Alt+clicking a cloneable part of the image and then carefully smoothing these portions by clicking on them with the brush.
- When finished, hit Control+E (Command+E on Mac) to merge Clone Stamp and Working Layer.
Recreating Lost Shadows Using the Burn Tool

-
- Select the Burn Tool represented by an icon that looks like a hand where the fingers and thumb are making an ‘O’.
- Above the image, next to Range: bring the drop-down menu to Shadows. The Burn Tool is specifically for the recreation of shadow.
- Set Exposure to 100%.
- Create a duplicate layer by clicking Layers > Duplicate Layer.
- Name this layer “Burn” and click OK.
- In the layer menu, toggle the Opacity to 100% so it is easier to recognize adjustments.

-
- Click on the image to apply the Burn tool to any areas that seem as though shadows have faded.
- Bring the opacity down until the burned elements appear more natural (usually at about 50%).
- When finished, hit Control+E to merge the Burn and Working Layer layers.
Using the Dodge tool to Recreate Lost Highlights

-
- Create a duplicate layer by clicking Layers > Duplicate Layer.
- Name this layer Dodge and click OK.
- Select the Dodge tool represented by an Icon that looks like a lollipop.
- Above the image next to Range: bring the drop-down menu to Highlights—the Dodge tool is specifically for the recreation of Highlights.
- Use the Dodge tool lightly at about 5% exposure.
- In the layer menu toggle the Opacity to 100% so it is easier to recognize adjustments.

-
- Click on elements that need highlighting, but be careful not to overuse the Dodge tool as it can make some photos appear grainy.
- Bring the opacity down until the elements where the Dodge tool has been applied appear more natural (usually at about 40%).
- When finished, hit Control+E to merge the Dodge and Working Layer layers.
Saving Your Work and Exporting Your Photo

-
- Go to File > Save to save the file as a Photoshop project. This retains the original integrity of the file in case you want to do any further adjustment.
- Go to File > Export > Export As.

-
- In the dialogue box under File Settings, select your desired file type. If you want to share online or use on the web, a .jpg is standard.
- Name and save the file as a .jpg in your desired folder.
Following these steps should result in a digital photo that can become a keepsake that you can use for your photo books or invitations for anniversaries and birthdays. With restoration, the key is to have a light touch as too much adjustment can make it look unnatural. However, if you follow these steps carefully, you will definitely see an improved appearance in any photos you would like to restore.


